I've operated as primarily an iPhone/iPad developer / UX guy for the past 3 years. This week I was tasked with the challenge to trial Xamarin and port a small checklist app we built for a client to both Android and Windows Phone.

I installed the latest version of VMWare fusion with a freshly installed Windows 7 64Bit image with Visual Studio 2012 Professional to my MBP 2011, 16 GB Ram, 2.2 GHz dual core i7.
My first thoughts: It works, I like it, it can potentially save a significant amount of time( some back of napkin calculations at the end of this post) :)
They have sample apps that you can build and run and learn from (After solving some errors and addressing some issues easily solved via stack overflow) to kick start your own development of an Android app in C-sharp.
They have a cool 3rd party component store, which is a great idea and may prove to be very handy in the future.
It states on their site "Easily create apps in C# for iOS, Android and Mac".
If you've ever used XCode, you'll know that as of version 4.6, it's naturally extremely good for building iOS apps, and any other alternative just isn't able to compete.
So in my personal humble opinion...ahem.. don't bother. Which leaves Android and Windows phone. Obviously Windows phone should be developed in Visual studio & C# anyway, hence you find the Xamarin website doesn't focus so much on Windows phone, however that's where Xamarin projects designed in a three tier architecture fits in so well, using the SQL data mapping, all of a sudden business logic and the data model (accessors, aggregation, algorithms and all of the other under the hood stuff) can be written once and used for all 3 operating systems.
Also it means Webservice code can be written once, which for reasonably large apps could make it much more economical to develop for multiple devices.
Well 4 operating systems if you include mac OSX... but it should be pointed out to non developer stakeholders the time it takes to write the User Interface / User Experience code for each operating system can still be a significant amount of the development effort, and Xamarin cannot help in this department, where some apps could require 90% UI/UX code and 10% business logic/Data model code, only 10% is being reused. Also (obvious to the developer but seems to fall through the cracks for other stakeholders like BA's the User interface design should be designed for the operating system following the OS guidelines.
So then the experience of the developer with native tools over C# should be considered. Whereas some apps could have a relatively large amount of business rules to develop for and it would suddenly be a very compelling option.
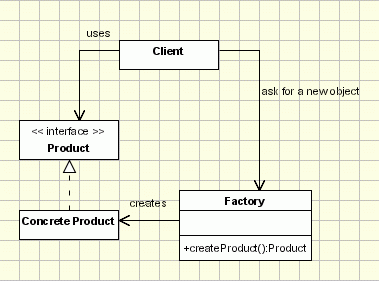
The general gist of the framework:

They have some case studies here.
Some first experiences I found:
 - You must have Xamarin Business Edition or higher to use Xamarin.Android from Visual Studio. They have their own IDE (fork of Eclipse) that you can use as an altnerative to Visual studio, but that's not ideal if you wish to build for Windows Phone as well. And entry level pricing ain't cheap, $999 gets you in the game as of writing this article.
 - Installing some of their sample apps don't work out of the box without addressing error messages and bringing in third party libraries such as Google Maps.
- I found the android emulators to be very slow, but that's Googles fault.
- Initially I pressed 'start with debugging' in the Tasky 10 minute guide I got a 'Failed to create pbuf surface' error, I restarted the machine and did a clean build without debugging which seemed to fix it.
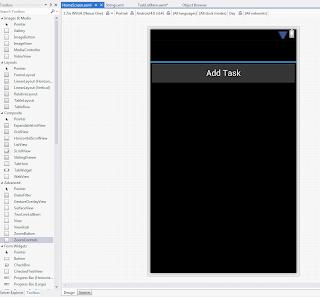
- The XAML editor for Android in Visual studio is pretty good.well it does the same job as in eclipse, however Laying out XAML for Android User interfaces is like playing battleships. It's an educated guessing game and you have to wait to preview in emulator for each change to see if you got it right. But if it's right on one Android device it could be completely off on a different device. Design is built into Apple’s DNA...Google has just bolted it onto its search engine. Ain't no avoiding this unfortunately.
Me in the Xaml editor:
- On first run of the 10 Minute guide I encountered this error despite following the instructions (The application could not be started. Ensure that the application has been installed to the target device and has a launchable activity), which fixed itself after a restart after I checked stackoverflow for help:

- I also found 5-10 minute loads causing VS to not respond (Microsoft Visual Studio is busy) on the emulator on first load then 1-2 minute loads from then on, no different to using eclipse of course:

Conclusion:
As an iOS developer, Xamarin has been a fairly quick and easy tool to learn once it's running.
The sample apps help for getting going despite some errors preventing things from working straight out of the box. The UI for android is still XAML based, but the UI logic can be written in C-sharp well enough for any basic design. Given that I'm not a huge Java or eclipse fan, this is really quite useful to me.
Running Android app builds on device instead of emulator is definitely a wise idea to save time given the huge time it takes to emulate.
The Tasky app serves as a great sample app to quickly get up to speed with how lists are handled compared with UITableViews in iOS.
Given that Android has many versions, with many devices with many resolutions, user interface design remains a time consuming task for the developer. So it should be clear to all stakeholders that Xamarin cannot address this. If you brake the dev time down (UI/UX, Business logic, Data Model). You can save time on the business logic and Data model, I would give generally speaking 50% of the time to UI/UX.
So if you were to dev the 3 apps with one code base for business logic and the data model you're saving 1/3 of your development time. This is of course subjective to the app your developing, but in any case you're going to save time. Just not as much as you might think on first impression.
Further Information and links:
- Xamarin's Developer Home page
http://docs.xamarin.com
- Xamarin / Mono touch tagged Stackoverflow questions:
http://stackoverflow.com/questions/tagged/monodroid+or+monotouch+or+xamarin?sort=active
- Xamarin for Android Docs
http://androidapi.xamarin.com
- Xamarin Components Store
http://components.xamarin.com
- Xamarin Forums
http://forums.xamarin.com
- Windows Phone Developer Home
https://dev.windowsphone.com/en-us
~Dave van Dugteren

I installed the latest version of VMWare fusion with a freshly installed Windows 7 64Bit image with Visual Studio 2012 Professional to my MBP 2011, 16 GB Ram, 2.2 GHz dual core i7.
My first thoughts: It works, I like it, it can potentially save a significant amount of time( some back of napkin calculations at the end of this post) :)
They have sample apps that you can build and run and learn from (After solving some errors and addressing some issues easily solved via stack overflow) to kick start your own development of an Android app in C-sharp.
They have a cool 3rd party component store, which is a great idea and may prove to be very handy in the future.
It states on their site "Easily create apps in C# for iOS, Android and Mac".
If you've ever used XCode, you'll know that as of version 4.6, it's naturally extremely good for building iOS apps, and any other alternative just isn't able to compete.
So in my personal humble opinion...ahem.. don't bother. Which leaves Android and Windows phone. Obviously Windows phone should be developed in Visual studio & C# anyway, hence you find the Xamarin website doesn't focus so much on Windows phone, however that's where Xamarin projects designed in a three tier architecture fits in so well, using the SQL data mapping, all of a sudden business logic and the data model (accessors, aggregation, algorithms and all of the other under the hood stuff) can be written once and used for all 3 operating systems.
Also it means Webservice code can be written once, which for reasonably large apps could make it much more economical to develop for multiple devices.
Well 4 operating systems if you include mac OSX... but it should be pointed out to non developer stakeholders the time it takes to write the User Interface / User Experience code for each operating system can still be a significant amount of the development effort, and Xamarin cannot help in this department, where some apps could require 90% UI/UX code and 10% business logic/Data model code, only 10% is being reused. Also (obvious to the developer but seems to fall through the cracks for other stakeholders like BA's the User interface design should be designed for the operating system following the OS guidelines.
So then the experience of the developer with native tools over C# should be considered. Whereas some apps could have a relatively large amount of business rules to develop for and it would suddenly be a very compelling option.
The general gist of the framework:

They have some case studies here.
Some first experiences I found:
 - You must have Xamarin Business Edition or higher to use Xamarin.Android from Visual Studio. They have their own IDE (fork of Eclipse) that you can use as an altnerative to Visual studio, but that's not ideal if you wish to build for Windows Phone as well. And entry level pricing ain't cheap, $999 gets you in the game as of writing this article.
 - Installing some of their sample apps don't work out of the box without addressing error messages and bringing in third party libraries such as Google Maps.
- I found the android emulators to be very slow, but that's Googles fault.

- Initially I pressed 'start with debugging' in the Tasky 10 minute guide I got a 'Failed to create pbuf surface' error, I restarted the machine and did a clean build without debugging which seemed to fix it.
- The XAML editor for Android in Visual studio is pretty good.
Me in the Xaml editor:

- On first run of the 10 Minute guide I encountered this error despite following the instructions (The application could not be started. Ensure that the application has been installed to the target device and has a launchable activity), which fixed itself after a restart after I checked stackoverflow for help:

- I also found 5-10 minute loads causing VS to not respond (Microsoft Visual Studio is busy) on the emulator on first load then 1-2 minute loads from then on, no different to using eclipse of course:

As an iOS developer, Xamarin has been a fairly quick and easy tool to learn once it's running.
The sample apps help for getting going despite some errors preventing things from working straight out of the box. The UI for android is still XAML based, but the UI logic can be written in C-sharp well enough for any basic design. Given that I'm not a huge Java or eclipse fan, this is really quite useful to me.
Running Android app builds on device instead of emulator is definitely a wise idea to save time given the huge time it takes to emulate.
The Tasky app serves as a great sample app to quickly get up to speed with how lists are handled compared with UITableViews in iOS.
Given that Android has many versions, with many devices with many resolutions, user interface design remains a time consuming task for the developer. So it should be clear to all stakeholders that Xamarin cannot address this. If you brake the dev time down (UI/UX, Business logic, Data Model). You can save time on the business logic and Data model, I would give generally speaking 50% of the time to UI/UX.
So if you were to dev the 3 apps with one code base for business logic and the data model you're saving 1/3 of your development time. This is of course subjective to the app your developing, but in any case you're going to save time. Just not as much as you might think on first impression.
Further Information and links:
- Xamarin's Developer Home page
http://docs.xamarin.com
- Xamarin / Mono touch tagged Stackoverflow questions:
http://stackoverflow.com/questions/tagged/monodroid+or+monotouch+or+xamarin?sort=active
- Xamarin for Android Docs
http://androidapi.xamarin.com
- Xamarin Components Store
http://components.xamarin.com
- Xamarin Forums
http://forums.xamarin.com
- Windows Phone Developer Home
https://dev.windowsphone.com/en-us
~Dave van Dugteren